Showing posts with label Daemons. Show all posts

Sunday, October 6, 2013

Weekend Workbench

Just a few pictures to show what I've been working on.
I added some extra details to the base of the Nightbringer/Daemon.  I plan on doing this kind of thing to a lot more of my models.  Just a few small things here and there can really help an army pop.
Skarre Ravenmane has her basecoat.  More work to do, but she's coming along nicely.  I'm really not a fan of metal models, but they're still better than finecast.
And the big deal of the week, you can't beat free!  I bought a box of Hellions about a month ago, because I love the models.  One of the local guys decided to get rid of nine still shrink wrapped boxes.  I'm a pretty big guy so I came out of the scrum with three.  So twenty Hellions it is!

Saturday, September 7, 2013

Hobby Update: On the Board

I haven't exactly been killing it so far this year when it comes to painting.  That, my friends, is what's called an understatement.

The good news is that, in the last two weeks, I've managed to focus and get some things finished.  And it only took until Fall got here.  The main project I've been trying to get to the Finished stage on my board is a squad of regular Chaos Space Marines for my Word Bearers.  After playing most of the year with an army in degrading disrepair, I'm making a push to get everything rebuilt to an appropriate specification.  In the exuberance of my youth, I glued plastic to plastic and tried to make a unit of dudes that each looked awesome individually.  Everybody is posed.  Everybody has the flashiest available bit.  Unfortunately, nobody looks particularly cohesive.  In game, it was pretty darn hard to remember who had what, where the assault weapons were positioned, and which unit had what.  That was how it felt for me, which made me feel bad for my opponent.  Heck, most of the time, I forgot to say who had what before it mattered.  It wasn't good.

So Squad One is done.  Who is squad one?  Ten Marines with bolt pistols and close combat weapons.  Everybody is armed that way, except the bros with meltaguns.  WYSIWYG.  While that's a simple change and something most veteran gamers already do, I feel like it makes a big improvement, both in terms of the way the unit looks and what that means to my games.  Cohesiveness is a wonderful thing.

I am pretty happy with the way these guys turned out.  From a distance, the red is a deep vibrant color, reminiscent of the crimson that made me want to play Word Bearers in the first place.  Up close, it's a little bit messier and a less consistent than I would like.  There are spots where I hit the highlights just right, and spots where things didn't quite come together.  On the plus side, four coats of red means the base layers are really in there, so my previous issues regarding a dark undercoat without enough pigment over top of it aren't an issue.  Despite a few flaws, I will proudly put these guys on the table.  Maybe it's not the best work I've done, but these guys are solid, if I do say so myself.

Then, surprise of surprises, the motivation kept on rolling!  The Coven Throne has been three colors of green for quite some time.  I laid down the first layers of airbrushing and haven't done anything since.  After finishing the Marines, I decided, "Hey, it's close enough to done if I feel like just a little more effort."  I laid down one more shade of green and then a really solid wash on the trailing vapors.  After that, I stared at it for a good five minutes.  It had all the colors I planned on putting on it, but it really didn't feel done, nor did it look like it belonged with other models in the same army.  When put next to the other models I have done, the green doesn't pop the same way and the contrasting colors simply weren't there.  If I wanted the models to mesh, I had a bit of work left to do.

So that meant more planning.  A friend of mine, who is an excellent painter, had previously suggested Warlock Purple would set off the greens nicely, but Red Gore would come off similarly and would help give the impression of allies when I run Daemons and Chaos together.  I also wanted some black to ensure the Throne tied in with the Manticore.  I knew that I couldn't change the colors on the spirits, so the throne section of the model was the only thing that could be altered.  Red never would have worked for all real estate, so I went heavy on the black for the whole thing and tried to catch some bits and bobs with flashes of color.  In all, it took me about two and a half hours of extra work, but it came together way better than I could have imagined.

So what's next?  I gotta keep it rolling.  I have a unit of Bane Thralls/Daemons to work on.  Then it's back to the second squad of regular Chaos Space Marines.  I've got a bunch of dudes in the drink, trying to get Simple Green to do the work of getting my stuff back to square one.  Hopefully the motivation keeps on rolling.


Hobby Accomplishments!
-Painted the first Coterie
-Painted the Coven Throne/Daemon Whatever
-Ran and played in a tournament (more to come)

To Do List!
-Get the other coteries cleaned up and new
-Paint the Bane Thralls/Lesser Daemons

Tuesday, November 27, 2012

Hobby Update: Spousal Perspectives, Death Company and More

I imagine that many men who play Warhammer or something like it have had something similar to the following conversation with their wives:

Wife:  I like that your army men are on the kitchen counter.  They're cute.

Me:  ...Um, they're the Death Company of the Blood Angels Chapter.

Wife:  They're still cute.
Can a unit with the Rage USR be cute?
Anyway, these past couple weeks have been good as far as painting progress.  Actually, quite good.  I managed to finish up the aforementioned Death Company.  I painted the entirety of three Banshees for some Daemons.  I airbrushed the first coat of green on a Coven Throne.  I finally finished remodelling my Defiler.  I primed a bunch of basic Chaos Space Marines.  Progress!

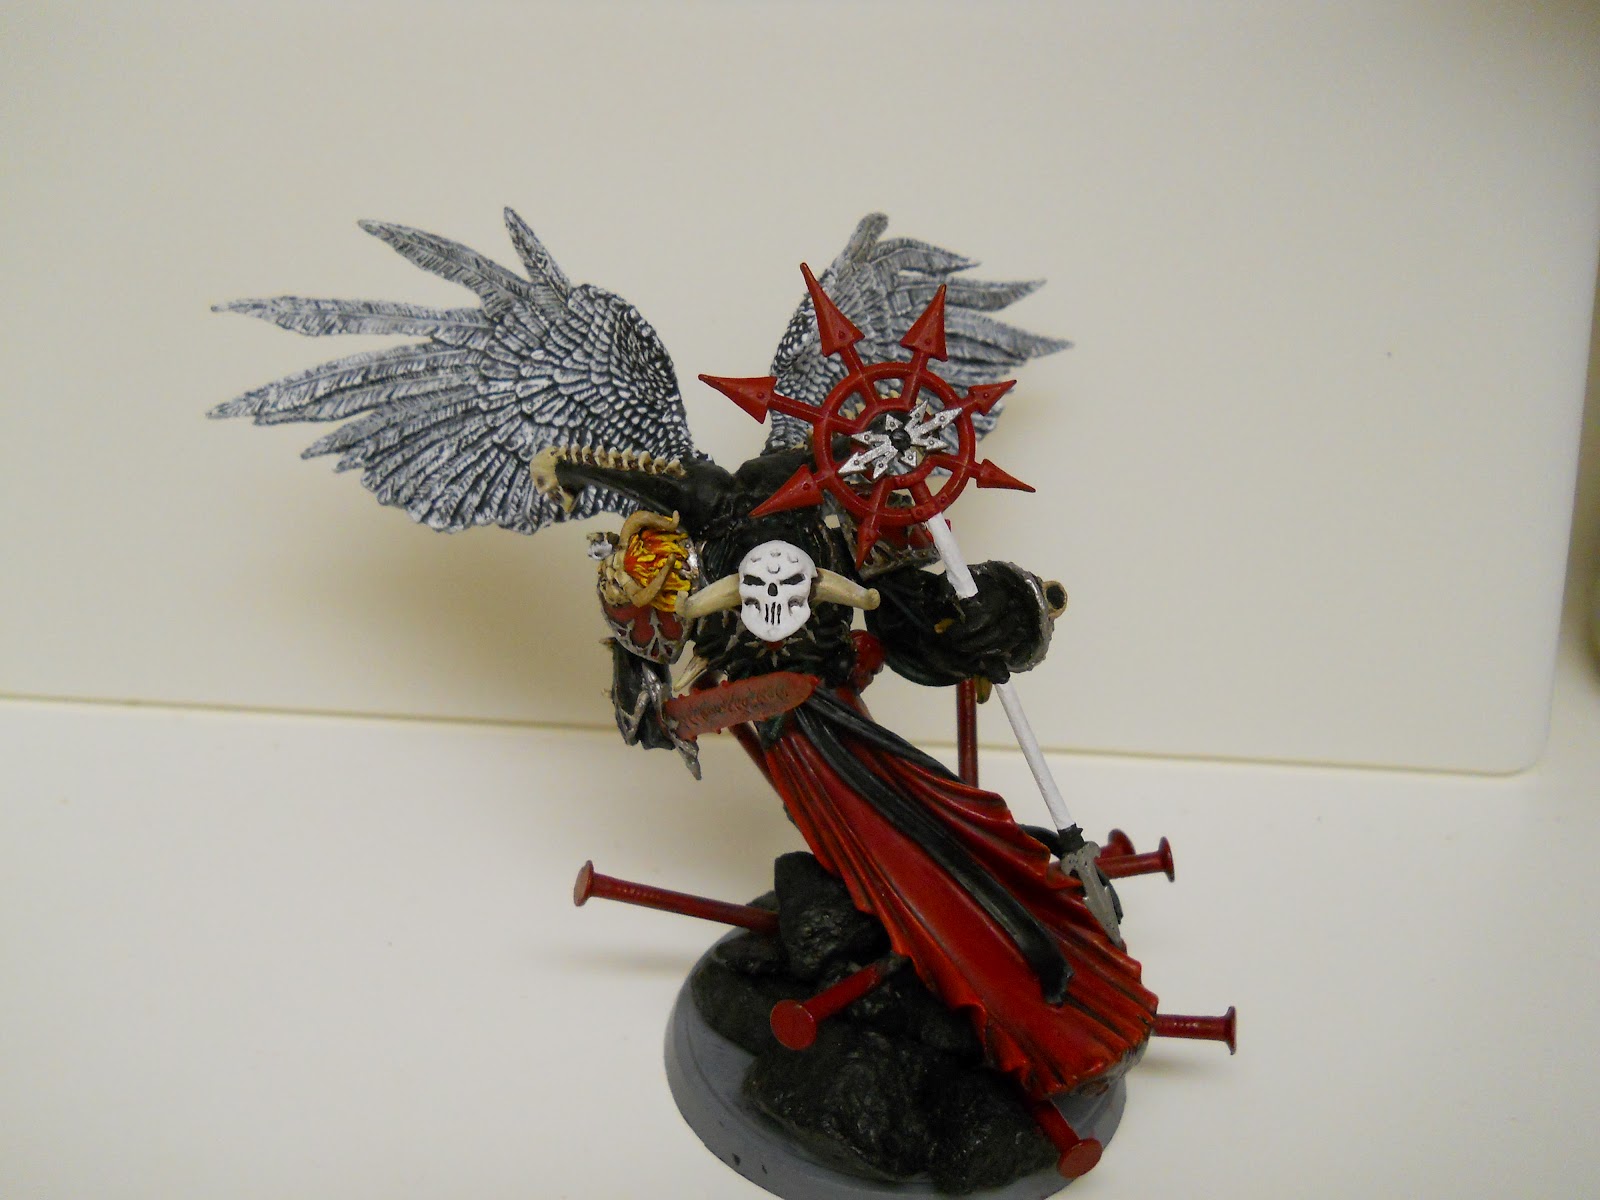
Of the ten models in the squad, one of them has been done for quite some time.  The remaining nine have sat with varying stages of colors finished.  At one point, all the actual Marines were finished, but the jump packs were still totally black.  Motivating yourself to bang out nine jump packs can be quite a task, but I managed to sit down and knock out three batches while watching football.

It's probably a little cliche, but I am feeling good about how they turned out.  OK, it's very cliche.  But once I slapped a layer of Dullcote on them, they lost a lot of the shiny black gloss color that tends to bleed through because of the crappy primer I use.  Prior to that, I was pretty nervous.  The varnish does tend to even things out, but it's definitely never a matte finish. So, happy surprises.  The other reason I like these guys is they include my first attempt at doing lots of highlighting.  In some cases, I may have gone a little overboard, but the orange really pops coming off the red, and the dark gray looks really good on the black armor without making them look like they're supposed to be gray.

Some of you who tend to focus on the play side of things may be wondering about the squad and its loadout of weapons.  Technically, Death Company can't take a meltagun, nor do they have a unit champion option, and seriously, where the heck are the power weapons?  Well, the squad was put together during fifth edition, when Allies weren't a thing.  This unit was intended to be a Skyclaw squad originally, but with the advent of sixth edition, I reached a point where I could conceivably include them as Death Company.  I'd love to do that.  What I'd really love to do is add five more dudes with power weapons and Infernus Pistols so I can do both, but we'll see what comes.

I plan on using them as Flamers.
Trying to prove that I can paint colors other than just red, I also painted a trio of Banshees for my Fear Daemons army.  My original intention was to try to do these girls in their entirety with an airbrush, or as close as possible to it.  That didn't happen.  I went all paintbrush.  Unfortunately, I had some serious issues with getting any kind of paint flow through the airbrush.  Turns out, I tried a little too hard to keep the pots clean and created some Q-tip blockage.  Whoops.  So I got that fixed, but not in time to work on these ones.

The models were originally from the Coven Throne kit.  I clipped off the tails after applying the paint, so I'd have something extra to grasp while I painted.  It was a pretty straightforward process.  The models got multiple layers of the same shades of green that I've used on some previous monsters, with lots of dark greens blending into much yellower versions. I've added some of the lighter colors towards the top of the models, which is a departure from the way I painted their big brother, the Nightbringer.  I tried to make those lighter colors more prevalent, but I think the extra layers could do with some more glazing to try to smooth it out.  I also might try to matte up the black some.

Briefly, I'd also like to touch on my Defiler.  Not in a dirty way.  A few weeks ago, I went a little nuts and ripped off all the legs and arms, plus I pulled the torso(?) from the chassis(?).  I'm not sure what to call what on a daemon engine.  Then I went even further off the deep end, magnetizing just about everything.  The result?  A defiler that was more transportable since I could take it apart and put it in a Rhino slot in my carry case, plus I could also easily represent the vehicle being immobilized, destroyed, or losing weaponry.  Success!  Except that the weight of the model was too great, so the Defiler just slid down to its base as the magnets would rotate.  Failure!  Because of that, I pretty much just left the thing at home.

Now he's a walker, instead of a sitter
After some practical thought about problem, I decided to go as simple as possible and glued some ordinary sprue to the Defiler's ball and socket joints.  This prevents the magnets from rotating, holding the legs in an appropriate pose.  It doesn't look pretty right now, nor will it when it is finished, but there's enough going on that I don't think it'll matter if I stick to dark colors in those sections.  Plus I'd much rather have a functional model at this point.

Hobby Goals
-Airbrush the Coven Throne by Wednesday
-Mechrite Red on the Chaos Marines by Saturday
-Silver on the Possessed by Sunday

Saturday, September 8, 2012

Hobby Update: A Return

It's been a pretty busy month.  Life is slowly starting to resume some pattern of normalcy.  I like what it seems to have in play and am looking forward to more.  As the pattern becomes more clear, hobby time has begun to appear in a regular fashion which feels pretty good.  Here is a sample of what that time has yielded.
One particular model has dominated my focus.  I have been working pretty diligently on the Nightbringer while rotating my attention between a few other units at the same time.  Rather than scrapping the current paint job and starting over, I decided to keep working on smoothing out the colors as they were.  The results have been generally positive, though I don't think I've had the same success as with the Manticore, nor do the colors run to as vibrant a finish as I'd like.  That said, it's a solid paint job in my opinion, and I'm ready to toss him on the field.
To do that, I had to build him a base.  I kicked off with a GF9 60mm magnetic base.  Because I plan to have a lot of other big models in the army, I wanted to make sure the Nightbringer would stand out.  It's a pretty easy effect to achieve in a Necron army where he towers over the basic troops, but on a disply board that has a Coven Throne and a bunch of other big creatures, the Nightbringer is so slight of build that he may not stand out as the centerpiece.  To save on glass material, I glued down a trio of 25mm bases on top of each other, then put the Nightbringer on those.  This bought me about an inch of extra height.  From there, it was a matter of adding rings of glass and building them up to the appropriate height and picking out a few things to add as detail around the base.

One of the aforementioned rotating projects includes a herd of old school/out of production metal Khorngors.  One of the reasons I like this project is that they're a return to painting some grittier fantasy models.  They'll get a little highlighting and a little shading, but they're line troops that are supposed to be dirty, with a bunch of natural browns, so I'm not sweating them too much.  They've been sitting in the queue for a while, but once they got in, they got done very quickly.  By far, the most effort consuming part was making the bases.  With everything else in the army, I just glued the model straight to the surface of the marble square.  The Khorngors were never going to be so simple.  The bottoms of the hooves are angled, providing minimal contact points, and the metal makes the models top heavy.  Basing them entailed snipping the metal strips for the slottabases into nubs, then drilling a pair of holes to sink the nubs into.  The end result is imperfect.  I have a few gaps to fill and hoofs that don't sit squarely.  Overall though, they seem to work just fine.
Finally, for those of you interested in nerdetry and sports at the same time, I recently completed a mock auction for a fantasy football league (the American version).  If you've only done a draft before, I'd encourage you to give an auction a chance.  It's extremely entertaining.  I'm pretty happy with my team:
QB: Michael Vick
RB: Lesean Mccoy
RB: Matt Forte
WR: Percy Harvin
WR: Marques Colston
FLX: Brandon Lloyd
TE: Cody Fleener
Def: NY Giants
K: Alex Henery

I have a pretty high ceiling for scoring from week to week.  My running backs should have consistently big numbers, and each of my receivers should yield solid weekly results, with chances for big plays.  My big worry is injury.  More than one of these guys has a history of getting hurt and my back ups don't inspire confidence.  I suppose that's the risk of paying to have nice things.  Resource management becomes tricky.  Finding value becomes important.  Patience gets put up against scarcity.  In a lot of ways, it's like many of my favorite games.  Except that I only get to play it once a year and don't know the result for four months.  Oh, and it's absolutely infuriating sometimes.

Hobby Accoplishments
-Finished the Nightbringer
-Finished the Khorngors
-Wrote down five of six missions for campaign project

Hobby Goals
-Get all six missions typed and finalized
-Finish the Death Company in the next two weeks
-Prep league format for two weeks from now
-Prime Banshees and Coven Throne
-Airbrush two coats on second Possessed squad

Friday, July 20, 2012

Hobby Update: Monster Mash

It's been a minute since I've thrown any models up here.  I've made plenty of progress, but that is what's supposed to happen over the course of three weeks.
The Nightbringer has seen a fair bit of attention.  I've got most of the colors down, but before I can be closer to "finished" status, I need to A) decide if I like the placement of the colors and B) work on getting the colors to blend together more smoothly.  If you compare the before and current versions of the model, you can see pretty plainly that the colors are migrating north and becoming increasingly extreme.  I'm not sure if this is a good or a bad thing yet.  I think I'm going to remain patient and decide when I've cleaned things up a bit more.


I've managed to do something somewhere between an update and a redo on my Dark Apostle Daemon Prince.  Previously, he had white armor with black wings.  Now he has black armor with white wings...  so the opposite.  But with a lot more colors applied and technique.  The wings started with Dawnstone, Badab Black, Codex Grey, then finally Skull White with a quick drybrush of the new dry compound Praxeti White.  From a distance, they look great.  Close up, I am less sold.  A few of the lines are a little less clean than I'd like, but I think the biggest issue is I may have left too much of the dark coloring behind.  I'm not sure how feasible it would be to fix without redoing the whole thing, so I think I'm going to make my peace with it.  I also redid the shoulder pads and highlighted the robes.  Previously the colors were clean, but flat, which was typical of my painting back in the day.  With a new Chaos book coming up, I really want to have my army up to what I consider my current ability to be.  This guy is definitely going to be a centerpiece so I'm glad to have him done.


My Defiler has been a pretty regular presence in my Chaos Army over the last few months... or always, I suppose.  It has always been an awesome model and being able to throw around a battle cannon shot is a lot of fun.  However, part of the model's cool factor comes from its size and design, which makes it tough to transport elegantly.  Because of this, his spiky bits tend to take a lot of damage.  I got fed up with it this week when he took a tumble and one of the legs popped off.  I gave the others a pull and they actually came off pretty easily.  Before I knew it the drill was out and magnets were setting in the glue.  Despite repeated testing, not all of them were set the right way.  As a general piece of advice, definitely set the magnets that are harder to get in first.  Now the model breaks down into eight pieces that fit perfectly into one of the random extra slots in my carrying case that is currently unoccupied.  My big problem is the guy is a little finicky about standing up.  It was top and forward heavy to begin with, and now the legs tend to spin and slide out from under him.  I might try a second magnet, but we'll see.  And of course there's the high possibility that they just give the walker a base when they update the book in a month or so.

I showed off the Possessed Marines I finished in one of my last hobby posts.  I was hesitant to start the next batch right away since I was hoping to acquire two more bodies and a few arms and legs from some friends.  Honestly, I never got around too it and, surprise, surprise, my patience ran out.  I raided my own bitz box and came up with an Ork head, some Crypt Horror hands, and a few other bits that got grafted on randomly.  They don't fit perfectly, but if you don't know to look for them (cuz you're not me) they'll blend well enough.  Now on to paint!

Hobby Accomplishments
-Finished the Dark Apostle Daemon Prince
-Built Possessed Marines from scratch
-Added layers to the Nightbringer
-Magnetized the Defiler
-Wrote rules packet for this weekends tournament... so all in all, a productive three weeks.

Hobby goals for the next two weeks
-Focus
-Get the next two coats of red on the Possessed
-Get red and gold on the Death Company
-Finish the Nightbringer

Friday, June 29, 2012

Hobby Update: And the other randoms

In an attempt to pique the interest of some of my board gaming friends about playing what I totally swore was a skirmish game, I acquired a pair of War Machine starter boxes quite some time ago.  Since then, they've languished in their primer.  I understand that put's me in the conversation for best painted at a War Machine tournament...  I kid, of course!  But seriously, one of the new guys at the club comes to us from playing War Machine, and I saw an opportunity to maybe get a little bit of use out of my small crew of Jacks.  It turns out they're super easy to get painted.  I knocked out the big jack while taking breaks from the Possessed, and the little ones in about 20 minutes apiece.  They aren't much more than table top quality, but I don't feel like putting a large amount of effort into models for games that I doubt I'll play a whole lot.  Still, a sense of accomplishment is always a nice thing.  You might recognize the color scheme.  I swear I know that other colors exist.  The first Jacks I painted were actually for use as Obliterators in 40K, so in an effort to be able to use them for both games, I found my options pretty limited.  I think it works pretty well though.


My other stated goal from previous updates was to get the Nightbringer fixed up and ready for paint.  A cursory glance told me I'd need a little green stuff.  When I started the more involved work, I found the work would need to be a bit more expansive.  Obviously that didn't faze me much, as I've got more than a few colors already on this bad boy.  I am starting to wish I had been a bit more patient.  I am careening forward without a plan beyond simply, "Make it green."  It's a more complex model than I initially thought.  The model has a robe that wraps around the body, parallel to the ground.  This breaks up the flow of the model.  The initial inspiration for the whole army was actually a simple dark to light transition on this piece.  Now I find I need a new plan.  I may go with all green on the robes, with black skin and green highlights.  That seems to be the simplest of solutions.

Friday, June 1, 2012

Basing and Resourcefulness

Rather than actually finishing the painting of the Manticore, I chose to spend yesterday fiddling with the bases of the monster.  You might have noticed that I chose to use the plural form of the word.  I have mentioned that I was waffling over what system to use the model for and eventually decided that with a little bit of cunning, I could have my cake and eat it too.  This feels extra nice in lieu of the recent announcement of impending price gougin... I mean adjustment.

Obligatory magnets = miracles joke

To the right, you can see the 60mm round base for 40K.  It started life as your basic GF9 magnetic base.  Up close and basically naked, it's not the prettiest, but I plan to use some red or purple tinted water effects to fill some of the gaps.  That plus a little bit of scraping on the excess superglue and I'll really be in business.  I used tinted auto glass from a wreck that happened outside a friends house.  It's a very dark surface, which means I have to be conscientious of ensuring some sort of contrast in the lower parts of all the models.  In this case, it will end up being a few brighter coats of red on the claws of the monster.  The surface is also reflective, which gives it an otherworldly quality that I think will be excellent for a daemonic army.

To the left, you can see the standard Fantasy base that I use on all my Warriors models.  It's not the most complicated process, but having to drill into the marble can be a rather delicate extra wrinkle.  I ended up drilling three separate holes for each spot on the base.  Once the holes were finished, I sunk three quarter inch magnets into each hole.  It's enough attraction that I can turn the model upside down and wiggle it a little without it falling off.  I'm hoping that never turns into a victory condition in a game.  I added a couple pieces of glass in addition to the usual marble.  The original plan was to have a few shards on the model itself, but I've backtracked on that.  They're already glued down, so I'm going to roll with it as best as possible, rather than trying to re-drill the holes. 


So at this point, I'm back to actually painting models.  I need to finish the body, after which I can paint the alternate head, albeit in a much less ornate style.  The heavy detail will be reserved for the riders.  In summary, for the cost of the model, plus eight kitchen tiles and a dozen magnets, I can use the big guy in two game systems and three different ways.  I'm thrilled with the way he looks, but the cheapskate in me is happiest about that.

Sunday, May 27, 2012

Hobby Update

Lately I've been keeping the number of irons in the fire at just two.  I began the week by finishing up a member of the Death Company clad in white power armor.  He needed a little cleaning up and a few details asked to be polished a bit, but it wasn't too much effort before he was finished.  I wouldn't call him perfect, but it's the best result I've had using that much white, and he's guaranteed to pop when people look at the squad.

My approach to the Word Bearers Possessed has been a little more workmanlike.  They're great models, but I think I bit off more than I could chew by trying to do ten at a time.  As it is, I'm up to doing the silver edging.  I'm making sure that I do at least some every day and that seems to be keeping the progress steady.  At the same time, I'm making more mistakes than I'd like to.  Every couple of shoulder pads has a little slip of silver paint that's just not in the right place, and it's starting to frustrate me.  It is also making me a little nervous as going back to repair the red might not yield the same result.

After a great experience painting the Manticore head, I jumped into painting the body pretty quickly.  That process turned out to be even quicker than painting the much smaller head.  I met with some level of success.  There are certain angles and certain parts where the color runs from dark to light in a smooth gradient.  Then there are parts where it looks like I painted a darker green next to a lighter green.  Again, it's not perfect, but I'm not exactly a Golden Daemon level painter anyway.  I have a few ideas of things to try to improve it.  Suggestions are welcome as well.  Really, I want to get him to a level where he holds up a little better under close scrutiny.  Once the greens are done, it's just a matter of a layer of black on the skin.  There won't be a lot of models in the army so if I can figure out how to achieve the right effect, I could keep the whole thing to a high standard. 


Hobby Accomplishments
-Finished the Death Company Shapechanger
-70% done with Possessed's Silver
-Manticore's green is painted

Hobby Goals
-Finish the Possessed Silver trim (by Wednesday) and decide what to do about the details to make them unique
-Try to improve the blending on the Manticore, apply the layer of black paint, and magnetize the Manticore's neck

Saturday, May 19, 2012

Back In Action

While I was visiting family, my computer decided it needed some time off as well.  After a brief visit to the laptop doctor, all seems to be right again.  In the meantime, here's what I've managed to finish up:
I kicked off with a full layer of Caliban Green
I followed that up with quite a bit of Warpstone Glow
From there, I got more extreme on highlights with Moot Green
Everything done thus far got hit with Biel-Tan Green shade
I added the first mix, with 2 Moot Green to 1 Flash Gitz Yellow
The green and yellow get swapped in proportion for the very ends
The more pronounced ends get just a little white
Everything gets a Waywatcher Green Glaze
And here is the whole palette